Making Our Own Galimotos

Grade K-2, How the World Works, Science

Central Idea: Forces make things start, stop and move in different ways

Lines of Inquiry:

  • How objects move in different ways (Function)
  • How forces change the way things move (Causation)
  • How movement can be changed (Change)

To wrap up our unit on forces and motion in a fun, engaging way we introduced our students to the story, “Galimoto” by Karen Lynn Williams. In this story, a young boy uses wire to make a push-toy car to play with. As a form of action, we challenged our students to use recyclable goods to make a toy that uses force or motion when played with. First, students identified what types of materials and resources we had at school that are considered, “recyclable.” We discussed how an item can be recycled if it is being used again for a new purpose. Students had many ideas, arguing that even the clay from art class could be recyclable!

Helping Out a Friend with their Galimoto!

After making our list of materials, students considered what they wanted to make using any of the materials we brainstormed. Students drew out their design for their toy, labeling each part of their design with what recycled item would be used to make it. Some students chose to make cars, others wagons or speedboats. Some got creative with their understanding of force and made a purse, stating that it uses force because you have to pull on it to pick it up. What became clear as students were designing, is that they had a strong understanding of push and pull forces and the different ways their movement can be changed. Students discussed related concepts like direction, speed, and weight when discussing how their object would move.

Finally, students built their creations! They had so much fun putting together their toys, testing out their ideas of how it would move. It was a great celebration of creativity and knowledge.

Showing Reading Buddies our Creations

Weather Patterns around the World

Grade K-2, Science, Who We Are

PYP Who We Are


Central Idea:
Awareness of weather patterns inspires people to create solutions for living safely and comfortably in different places.

Lines of Inquiry:

  • Patterns in weather in different places (form)
  • How people design solutions to solve problems (causation)
  • How people prepare for and respond to weather (responsibility)

What? Students explore their own identity through reflecting on memorable weather experiences and how they needed to respond to different types of weather.

How? This project began because of a student inquiry in the response to the question, “is the weather always the same in every country?” Students and families were asked to email 3-5 photos of their child experiencing weather in a different country to the teacher. It could be a country the child used to live in or a country the child had visited on vacation. Once I received the photos, I put together a basic “presentation” for the child (although if time permits and students have the tech skills, students could do this piece themselves.) Each child then shared about their weather experience, first showing where the country was on a map of the world and then sharing the photos. For the share, children discussed their experience with weather and any seasonal patterns they know of in that country and. how they needed to prepare of the type of weather they were sharing about.

Here is the outline for the presentation-

1. Child shares where their country is on a map
2. Child shares what the weather was like in the country when they were there and what they needed to prepare for that type of weather.
3. Presenter answers questions from classmates.

Why? Allowing the children to “take us” all over the world with this fun presentation, provided an opportunity for each child to share a place and a memory vastly important to them. Identity was explored further when each child got to both ask and answer questions from their classmates about their experiences, allowing us to learn new things about one another. Since many children had never experienced a different weather type than a sunny and rainy weather pattern, this provided an opportunity for students to be knowledgable and learn from each other. We practiced our listening skills, question asking skills, and presentation skills, all while being Inquirers about each other’s lives and why different weather patterns exist.

Our final weather patterns map after each child had shared their weather experiences. This map was teacher created throughout the unit using the data students shared about their weather experiences in each country.

Additional Note:

Incorporating weather into a Who We Are unit was both a challenge and an eye-opening experience for me as an educator. This unit came as a review of our Science Curriculum to incorporate the Next Generation Science Standards, a product of robust conversation and questioning as to its fit. Although there are still much elements on How the World Works in this unit, it was clear from teaching it that our experiences with weather do indeed play a huge part in how we grow up and who we become.

Material Lab Activities- Plastic

Grade K-2, How the World Works, Science

PYP How The World Works


Central Idea:
The Form of Material Impacts It’s Function

Lines of Inquiry:

  • The properties of materials (form)
  • The way materials are used (purpose)
  • Design (function)

What? Students have been inquiring into the properties of materials using their 5 senses for observation and the scientific process to test the properties of different materials. Students now have the opportunity to pick one type of material to research in depth during an immersive lab experience

How? Welcome to the plastic Lab! This is what our sign read to greet parents for our Celebration of Learning concluding our investigation and lab experience. The children walked their parents through their process from beginning to end with each activity we did in lab. Here’s the first 3 days of our process as a lab group:

  • Day 1: Opening Question: What do we use plastic for? Why? After discussing, children explore everyday household plastic objects including shampoo bottles, yogurt containers, water bottles, and classroom toys. Children use magnify classes to look closely and think about what they can learn from each of their senses. Discussion: What did you notice about plastic? To conclude, children are given a lab notebook. On the first page they wrote down a question they had about plastic.
  • Day 2: To begin, I showed students a picture of a tortoise (we several at school that roam the campus), but you could use any picture that is fun and relatable to your students. Opening Question: How would you describe this picture of a tortoise? I wrote down the words students were using to describe the tortoise, then we discussed that these were the characteristics of a tortoise. The children already knew this word characteristics because of our previous unit Who We Are. I then showed students some of the plastic they were looking at yesterday and asked them. What are all the words you could use to describe plastic? I gave my students each a few sticky notes and they wrote down as many words as they could with one word per sticky notes. We put up all the words on the board and I told students that because plastic is not a living thing like a tortoise, these words are all called the properties of plastic.
  • Day 3: Opening Question: Why do you think we produce plastic? This opening question was also one of my students’ inquiry questions from the first day! I showed them a collection of images of plastic items before allowing them answer the question in a group discussion. Students said anything from, “to make toys”, to “because you make anything out of it!” I showed them a list of words they had came up with from the previous day and read that list to them- hard, soft, pointy, strong, smooth, etc. Do you know what opposites are? I asked them. Some students did! A lot of the words my students came up with were opposites which we found interesting, which is why plastic is so unique and ultimately why plastic was produced. We read a chapter in the book, Plastic, about Alexander Parkes, the creator of plastic and how and why he made this material.
Drawing and Writing What We Think Will Happen During an Experiment with Plastic

Why? Students are naturally curious about what they use, and observe in their everyday life. Since all students got to choose which lab group they wanted to go into for this part of our unit, students were motivated and asked so many great questions which I used to move this unit along and hit on each line of inquiry. Our celebration of learning was a good opportunities to see which activities students had liked the best. Student rushed to show their parents how to fuse plastic beads together and were proud of their overall plastic designs, two of the activities we did later in this unit. Since this unit was full of hands-on activities and ended in a product students were proud of, they gained valuable collaboration, organization, and presentation skills.

Testing for Control Variables in a Fair Test

Grade 3-5, How the World Works, Science
Student Workpage

Central Idea: Experimenting and investigating lead us to uncover how the natural world works.

Line of Inquiry: Defining the factors that determine a fair test

What? Students participate in “unfair” tests with a small group in order to determine what makes a test accurate.

How? After a whole class example of how to perform the first activity on the sheet to the left, each group followed the procedure to complete all three activities. For the first activity, a soccer ball and a kick ball were dropped from different heights and the bounce height was to be recorded. My students were able to determine that the data they gathered from each test was not valid. Additionally they identified what conditions need to be controlled (controlled variable) in order for the results to be accurate.

Why? Scientists do everything in their power to obtain accurate results when conducting experiments in order for their discoveries to be valid. Understanding what makes a test unfair will help my students set up experiments and activities that give proper results.

How to Take ANY Child’s Interest and Turn it Into a Lesson

At-Home Learning, Grade K-2, Science, Social Studies

Last week, I took my students to the park near their house to do some detective work on plants. I noticed early on this year their genuine interest in nature, as the girls were actively picking wish flowers and blowing their seeds across the grass. I determined a perfect lesson to connect to their interests would dig deeper into discovering plants life-cycles.

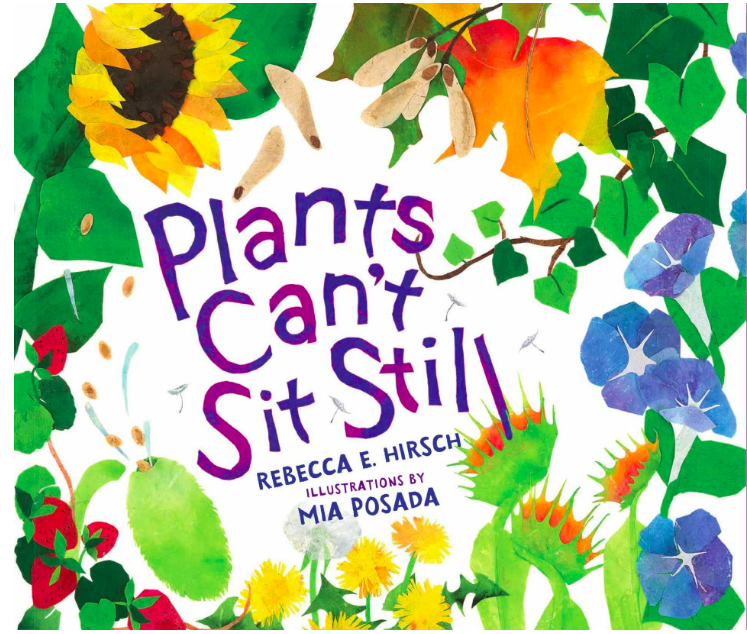
The teacher tip here is to observe your child first to find a topic of natural interest. In this blog post, I am going to teach you how to turn that interest into a book lesson to engage your child wholeheartedly in the topic. This set-up works for any interest! Though I will be giving you an example of the framework using the book “Plants Can’t Sit Still” by Rebecca E. Hirsch, in case you want to use this content. There is a youtube recorded version of the book here –> Plants Can’t Sit Still.

  1. Start with a Question

A good question sparks dialogue around the topic you are teaching, without giving the child any prompted “right” answer. A question should be simple, easy to comprehend, yet have a complex or not straightforward answer. Often you can get a question from a picture book by identifying what the book is trying to teach, then asking about prior knowledge connected to the topic. For example, a book about trucks going to the dump for a preschooler might be teaching the child how waste management works. For this topic, you might use the question –> Where does our trash go when it leaves the house?

Asking a question is always my favorite part of the lesson, because it’s truly interesting to hear a child’s opinion. Often, their ideas are logical, and force you as the teacher to think about an idea a new way! But the key is . . . they often are not correct.

For my Lesson: Question –> Do plants move?

I started with asking this question, “Do plants move?” and I LOVED the responses my students gave. My older student in 1st grade was quick to say no. I asked her why to learn more. “Plants don’t move because they’re always in one place and they stay there.” She explained. She was right . . . plants do stay in one place, normally. “But what about the wish flowers?” I countered, they move. “Once we blow on them!”

This was super interesting to me, and lead to more discussion about whether a tree specifically moves. To further engage we could have gone on a tree hunt at this point in the lesson and found baby trees, medium trees and big trees, and considered why some trees are so small and some are really big.

2. Discover Something New

Immediately in the first few pages of the book, there is normally something that counters the child’s original theory or at least gives him or her more information about the topic. The teacher tip here is to identify a new discovery a child can make in the first few pages of the text and ask follow-up questions. Examples for this could be something as simple as in the text there is a line that gives new information, or maybe for the dumpster truck example there is a picture that shows a dump truck driving down the street but doesn’t mention the truck yet. This would be a great time to ask your child what he or she sees in the picture and how they think that might connect to trash. Can trucks carry trash? etc. Look at both the text and the pictures for a new discovery.

For my Lesson: Discovery through Text: “Plants don’t have feet or fins or wings, yet they can move in many ways. Look closely and you’ll discover that plants can’t sit still.”

After reading these opening lines of text, my older student was outraged. “That’s not true!” so announced. All they do is sit still. She was not convinced by text alone. We brainstormed reasons why the author might be saying that. What could the author mean? To get a better understanding of what we already knew about plants. Then we flipped the page with anticipation . . .

3. Read until you Finish the Text

Since the purpose of this lesson is to learn more about your child’s interests, I’d advise you to not spend too long on the text for this lesson and spend more time on the next step. Because of this, consider picking a short picture book that will only take you about 5-10 minutes to read. This way, once the text is done, your child is still energized and eager to learn more about this topic rather then tired from sitting in one place.

4. Turn the Book to Life

This is the essential step for this lesson. It’s about experiencing what is in the book! This will look a little different depending on the book you have selected and the topic of discovery. But the goal here is to give your child a better understanding of the text by bringing the text to life. For the truck dumpster book, this might mean visiting the local dump. For a book about bugs this might mean going outside and counting how many different types of bugs we can find outside. For a book about something more fantasy based, like fairies, this might take a little research on your part. I recently went on a family trip to ME where we visited a botanical garden with a fairy-garden designed for children that would be perfect to bring out that creative imaginary side. Often we think that that learning about an interest has to be about something real, but theres truth to even imagined things! At the fairy park you could talk to your child about why they think the park build the fairy-homes out of wood? What else could fairy homes be made out of? or why are there so many bright flowers planted? What kind of feeling do bright flowers bring out?

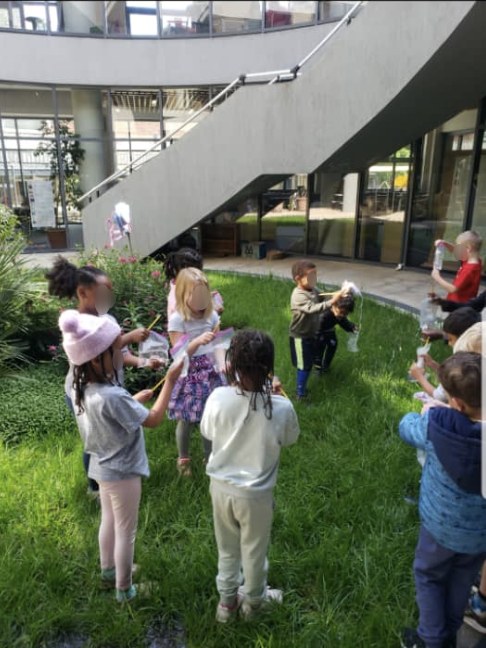
For my Lesson: Dandelion or Wish Flower?

For this portion of the lesson, we looked at both Dandelions and Wish Flowers and noted their similarities and differences. One thing we found, was that the leaves were actually the same for both flowers which was fascinating. Going back in the text, we noticed that the inner cover of the book actually showed us both the flowers we were looking at in greater detail. It appeared that the flowers both grew from the same seed, and in fact the dandelion actually turned into the wish flower. Woah! This was exciting because we learned that not only do plants not sit still, but actually plants can change appearances completely from one stage of their lives to another. Imagine if humans could do that! Nature is pretty cool. 🙂

As a reflection writing this now, I also realized that another really neat experiential portion of my lesson could have been to go to a sunflower farm. Last week was the end of sunflower season and one of the plants this book focused on was how plants start small and grow tall to reach for the warmth of the sun. This could have been another really cool investigation for this book!

In Conclusion, I hope the ideas from this post serve you well. Remember, you can use any book or any interest for these lessons, so you can easily plan from books and materials you already have at home!! These lessons can even be broken up into two parts to fit busy schedules, perhaps reading during the school week and the “Turn the Book to Life” part happening as a family activity on the weekends. The more connections you can help your child make between school tasks and real world life the better! Enjoy, and get creative 🙂